Sunday, June 30, 2013
Monday, September 10, 2012
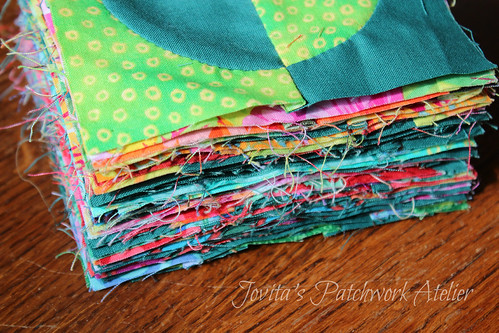
Jane's Pancake Stack
This is what 44 Jane blocks look like stacked up all nice and pretty.
More tutorials will come ... but they're sadly on the back burner
with so many other things up in the air.
with so many other things up in the air.
It's been so long I really need to check in with the other
Girls under the Willow Tree to see what they're up too.
Girls under the Willow Tree to see what they're up too.
We're all dealing with our little bits of life that take have to take priority over Jane.
Monday, May 28, 2012
4 Easy Machine-Pieced Blocks for Jane
I am sure you think by now that we've all gone away ... never to be seen again. But it's not true. Sometimes life just throws out a few challenges and we find it necessary to answer them first.
We're all here. We're all doing "ok" in our own way. But struggling to keep up with things. Again, I'll try to check in with the other girls. But hey ... it just might be me for a while.
I pulled Jane out of the cupboard today. She's been staring at me. Not guiltily, just in a "you'd feel better if you made a block or two" kind of way. She was right. I made 4 and I feel great!
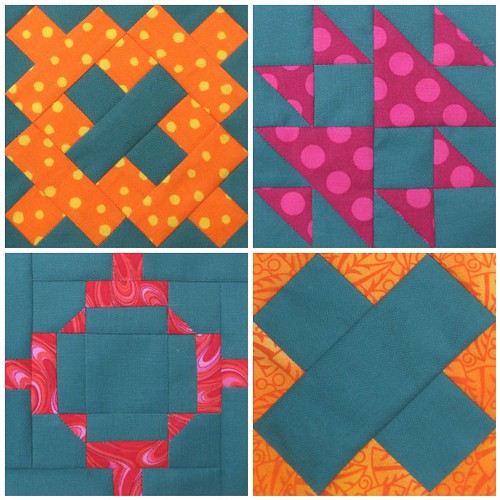
First I needed a kick start. Something easy. I grabbed my book and it fell open to page 90 and my I went straight to J-2. Not bad. I could handle that.
So I grabbed my trusty 6-1/2" ruler and set to measuring.
Background (my solid teal):
We're all here. We're all doing "ok" in our own way. But struggling to keep up with things. Again, I'll try to check in with the other girls. But hey ... it just might be me for a while.
I pulled Jane out of the cupboard today. She's been staring at me. Not guiltily, just in a "you'd feel better if you made a block or two" kind of way. She was right. I made 4 and I feel great!
First I needed a kick start. Something easy. I grabbed my book and it fell open to page 90 and my I went straight to J-2. Not bad. I could handle that.
So I grabbed my trusty 6-1/2" ruler and set to measuring.
 |
| Dear Jane® book reference: Block J-2, page 90 |
Background (my solid teal):
- Four 1-3/4" squares
- Two 3-1/4" squares ... cut each in half diagonally so you will have 4 triangles for the corners.
- Two 3/4" x 1-3/4" pieces
- Three 3/4" x 3-1/4" pieces (these will be a tad long, trim it to length after you've sewn it to 1/2 of the center section)
- Two 3/4" x 3-3/4"
It's really a pretty simple block. But after sewing the very center section together I checked that it was square before adding the teal frame all the way around. Then I sewed the four print corners and finally trimmed the finished block to 5" square making sure that I have a 1/4" seam allowance beyond each point.
Print:
Then I went about sewing, pressing, trimming repeatedly. Sew two print triangles to opposite sides of the center square, press then trim the points of the triangles flush with the square. Sew the opposite sides, press and trim the completed square-in-a-square unit. You're aiming for about 2-1/16" square - not generally an easy measurement. The idea is to trim it like Block J-2 above - allowing for 1/4" seam allowance beyond the tips on each side. Then sew the next set of triangles. This time solid backgrounds first to opposite sides, press and trim. Then to the opposite sides again. Press and trim this unit to 2-3/4". Finally add another set of triangles - using your print. And trim this time to about 3-5/8" ... the most important thing is those tips again, don't cut them off. Concentrate on having a 1/4" seam allowance. To add the border, I sewed the triangles to the end of the 1-1/4" pieces then trimmed that long even with the long edge of the triangle. Then added the second piece and trimmed again. I'd be happy to post a pic if you like - just let me know. THEN I trimmed the entire block to 5" .. it really worked out. I was dead pleased. You could paper piece this one ... but this rotary cutting and machine piecing worked out so slick that I am very glad I didn't.
So, ready for block three? This one really couldn't get any easier. I chose to strip-piece in two short lengths (cuz that's how long my poison green scrap was ... a tad over 6").
Background (my solid teal):
Print:
Background (my solid teal):
Print:
For the pinwheel: Place 2-3/8" squares of background and print right sides together, draw a diagonally line on the wrong side of whichever you can see best. Sew a 1/4" seam from each side of this line. Cut apart on the line and press to the darker fabric. Trim these units to 1-7/8" square. Sew together as a pinwheel, spin the intersecting seam to reduce bulk.
For the corner triangles: Place 1-7/8" squares of background and print right sides together, draw a diagonally line on the wrong side of whichever you can see best. Sew a 1/4" seam from each side of this line. Cut apart on the line and press toward the background fabric - even if it is lighter. This will help to reduce a lot of bulk. Trim these units to 1-3/8" square. Sew two of these to the end of a 1-3/8" x 3-1/4" piece twice.
Assemble the block by sewing the remaining 1-3/8" x 3-1/4" pieces to each side of the pinwheel. Press toward the background and add the other border to the remaining two sides. Press again toward this "border."

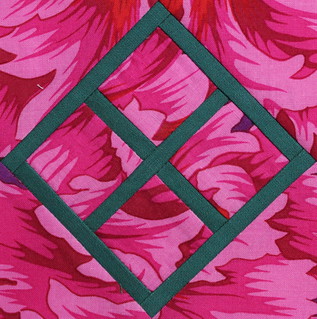
1. A-1, 2. A-2, 3. A-3, 4. A-4, 5. A-5, 6. A-7, 7. A-8 (re-done), 8. B-1, 9. B-3, 10. B-4, 11. B-9, 12. B-10, 13. C-1 (adaptation), 14. C-3, 15. C-6, 16. C-9, 17. C-10, 18. D-9, 19. E-3, 20. F-7 (changed), 21. H-13, 22. I-1, 23. I-8, 24. J-2, 25. J-6, 26. K-7, 27. L-4, 28. L-5, 29. L-7, 30. M-2, 31. M-9, 32. M-12 (sadly it won't show itself unless you click on this link)
Back to the book, I was ready for another. I think this one would have been just as quick if I hadn't started with the wrong size for the center square. A deep breath and started again resulted in this beauty that was very pretty before I decided to zap it with a bit of spray starch.
 |
| Dear Jane® book reference: Block I-8, page 85 |
Background (my solid teal):
- Two 2-1/2" squares cut each in half diagonally so you will have 4 triangles
- Two 2-5/8" squares cut each in half diagonally so you will have 4 triangles
- Two 1-1/4" x 2-3/4" pieces
- Two 1-1/4" x 3-1/4" pieces
Print:
- One 1-5/8" square for the center
- Two 2-5/8" squares cut each in half diagonally so you will have 4 triangles
- Two 1-7/8" squares cut each in half diagonally - you'll use these in the final "border"
Then I went about sewing, pressing, trimming repeatedly. Sew two print triangles to opposite sides of the center square, press then trim the points of the triangles flush with the square. Sew the opposite sides, press and trim the completed square-in-a-square unit. You're aiming for about 2-1/16" square - not generally an easy measurement. The idea is to trim it like Block J-2 above - allowing for 1/4" seam allowance beyond the tips on each side. Then sew the next set of triangles. This time solid backgrounds first to opposite sides, press and trim. Then to the opposite sides again. Press and trim this unit to 2-3/4". Finally add another set of triangles - using your print. And trim this time to about 3-5/8" ... the most important thing is those tips again, don't cut them off. Concentrate on having a 1/4" seam allowance. To add the border, I sewed the triangles to the end of the 1-1/4" pieces then trimmed that long even with the long edge of the triangle. Then added the second piece and trimmed again. I'd be happy to post a pic if you like - just let me know. THEN I trimmed the entire block to 5" .. it really worked out. I was dead pleased. You could paper piece this one ... but this rotary cutting and machine piecing worked out so slick that I am very glad I didn't.
So, ready for block three? This one really couldn't get any easier. I chose to strip-piece in two short lengths (cuz that's how long my poison green scrap was ... a tad over 6").
 |
| Dear Jane® book reference: Block M-12, page 119 |
- Two 3/4" x 6-1/2" lengths
- Four 2" squares
Print:
- Four 3/4" x 6-1/2" lengths
Sew one length of background a length of print. Press toward the background - yes, even if it is lighter. You'll be glad you did this. And tomorrow I'll take a pic of the back of my block so you can see how flat it lays. Sew another length of print to the other side and press again toward the background. Repeat this so you have two "racing" stripes. Trim the end of each strip square (line up your ruler against a seam, not the edge of the print fabric), then cross-cut each stripe into three 2" sections. Yes, you'll have one left over as a spare. Sew together as a 9-patch. Spin the intersecting seams at the corners. Yes, I know that pic would really help right about now ... tomorrow ...
Finally, block 4. This one really wasn't bad either. Just a pinwheel with a border.
 |
| Dear Jane® book reference: Block E-3, page 50 |
- Two 2-3/8" squares
- Two 1-7/8" squares
Print:
- Two 2-3/8" squares
- Two 1-7/8" squares
- Four 1-3/8" x 3-1/4"
For the pinwheel: Place 2-3/8" squares of background and print right sides together, draw a diagonally line on the wrong side of whichever you can see best. Sew a 1/4" seam from each side of this line. Cut apart on the line and press to the darker fabric. Trim these units to 1-7/8" square. Sew together as a pinwheel, spin the intersecting seam to reduce bulk.
For the corner triangles: Place 1-7/8" squares of background and print right sides together, draw a diagonally line on the wrong side of whichever you can see best. Sew a 1/4" seam from each side of this line. Cut apart on the line and press toward the background fabric - even if it is lighter. This will help to reduce a lot of bulk. Trim these units to 1-3/8" square. Sew two of these to the end of a 1-3/8" x 3-1/4" piece twice.
Assemble the block by sewing the remaining 1-3/8" x 3-1/4" pieces to each side of the pinwheel. Press toward the background and add the other border to the remaining two sides. Press again toward this "border."
So there you have it. Hmmm, enough info? If you're struggling with any of these instructions or need more help, PLEASE don't hesitate to ask. I'll do my best to take additional photos.
So I'm up to 32 blocks? How about you? Any you are struggling with?
These are the ones I have made so far.
Pretty wild.
And I am really loving it without sashing.
keep in mind I am not following Jane's setting.
mine will be set in a rainbow trip around the world
Did you know that Jane's quilt did not have sashing??
Tuesday, September 20, 2011
Carnival (Kermis) Brights!
Happy sewing to you all .. things are bright and colorful around here. Kermis is in town although I have to admit it's much more bearable this year. It rained the first couple evenings which meant things closed down much early. Today is the most important day .. Jaarmarkt .. so I sat on the sidewalk with handwork and drew quite a few onlookers eager to know what I was doing and Why? Oh, and by the way, how did an American end up in Kalken???
Wednesday, September 14, 2011
Wednesday Works (in Progress)
I've been sadly neglecting Jane too long ..
Quite a few blocks are "in progress" but I have no finished to show ... hopefully soon. Please don't give up on me.
 I've been holding my breath all week. "Kermis" comes to Kalken this weekend and we're hoping beyond belief that we can avoid a repeat of last year.
This photo was taken from our bedroom window - let's just say we don't sleep much for three days! so far there's no sign of the bus stop being blocked and any set up at our end of the road/village .. but there's still tonight. Last year they parked up their rigs in the middle of the night with a lot of shouting "no, a little more Left. LEFT. I said LEFT!!!"
oi vey .. g'night all .. if all goes well I'll stay indoors and stitch and stitch away and have lots to show when the Kermis pulls out of town on Wednesday next week. xox Jovita
Quite a few blocks are "in progress" but I have no finished to show ... hopefully soon. Please don't give up on me.

This photo was taken from our bedroom window - let's just say we don't sleep much for three days! so far there's no sign of the bus stop being blocked and any set up at our end of the road/village .. but there's still tonight. Last year they parked up their rigs in the middle of the night with a lot of shouting "no, a little more Left. LEFT. I said LEFT!!!"
oi vey .. g'night all .. if all goes well I'll stay indoors and stitch and stitch away and have lots to show when the Kermis pulls out of town on Wednesday next week. xox Jovita
Sunday, August 28, 2011
Hot August Not
Honestly, where does time go ... ? In the back of my mind I've had this nagging feeling (along with a couple of migraines) that I haven't blogged here ... but then neither has anyone else.
I promise things HAVE been happening behind the scenes.
You see ... I got kind of caught up ... in a crazy hexagon craze! This wasn't really supposed to happen, considering I'm still busy busy on this and this. But you see, Lynne of Lily's Quilts started a "HEX A LONG" inspired by this quilt and then ....
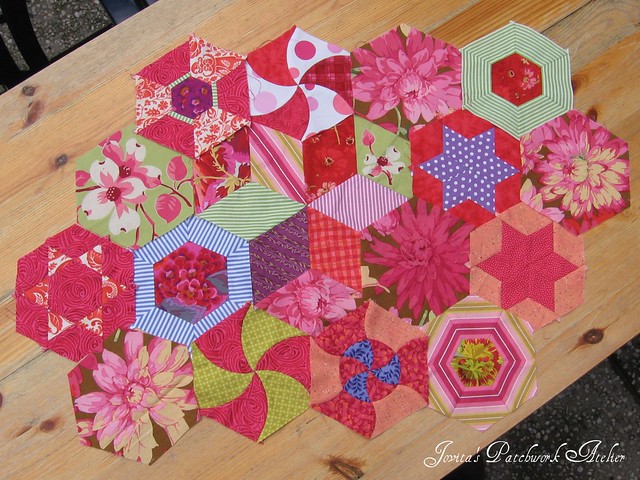
I only allow myself to work at this one a block at a time during the week and even then evenings only ... but weekends are fair game.
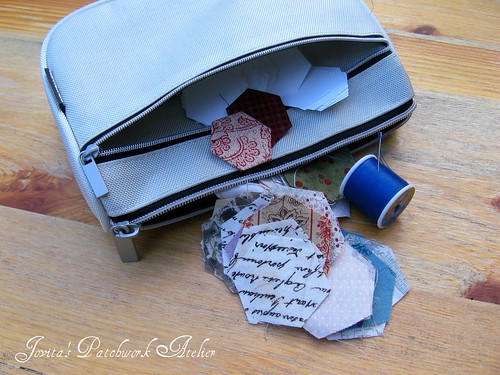
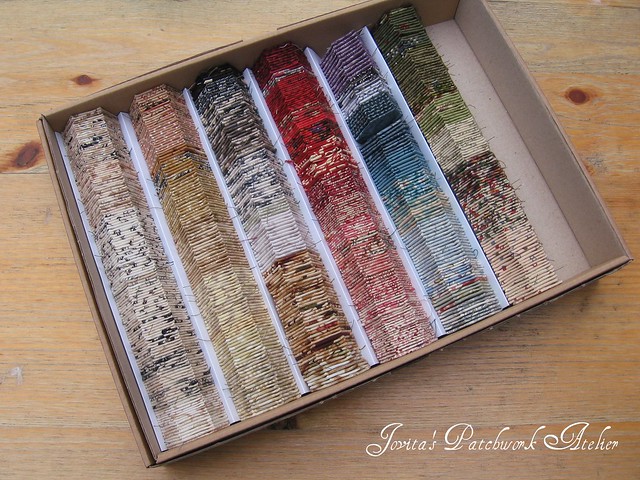
Then, there's this one, my take-along everywhere project. I picked up this simple but inexpensive case at Ikea (yes, I know coulda-shoulda *made* it but this way I have more time to stitch *fun* things). Makes taking along so simple: doctor's office, 5-hour round-trips to Germany, the garden for a half hour each evening when Axel comes home. When I get back, the hexies get sorted into my tray to make sure I'm keeping my color saturation where I want it. Am anxiously awaiting the arrival of the fabric I designed and was printed by Spoonflower and another order of Japanese fabrics ordered from the states. Also found some more gorgies at a friend's shop nearby.
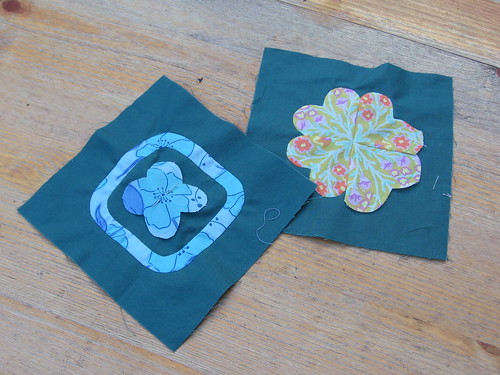
And I promise to get busy on Jane again ... I realized today that I never blogged about my "fake" method for reverse applique - so that's on the top of the list for this week.
Maria, on the other hand, has been busy with Jane and you can see more of her gorgeous blocks here.

I know Deb has been busy too getting ready for their quilt show. Now if only we'd been smart-er and had told you about it before the show ...
And I'll be checking in with Dana later tonight.
Mary? I am sooo excited .. we've made a date .. to have coffee and exchange our little quilts .. in November!!
So, what have you been up to? Has your weather been as crappy as ours (not that I'm complaining - wink ... our summer just came early - April / May early and now fall is firmly on it's way). Are you busy with the summer, kids going back to school, new projects, heaven forbid that jump start on Christmas gifts? Tell us what's on your sewing table ... we'd love to hear, and if you have a blog we'll be sure to stop by and see!
Don't forget I blog over here too .. you'll find my latest knitting project, a day out in Gent, a another quilt along - I'm one of the designers ... and more! I hope you'll stop by!
I promise things HAVE been happening behind the scenes.
You see ... I got kind of caught up ... in a crazy hexagon craze! This wasn't really supposed to happen, considering I'm still busy busy on this and this. But you see, Lynne of Lily's Quilts started a "HEX A LONG" inspired by this quilt and then ....
I only allow myself to work at this one a block at a time during the week and even then evenings only ... but weekends are fair game.
Then, there's this one, my take-along everywhere project. I picked up this simple but inexpensive case at Ikea (yes, I know coulda-shoulda *made* it but this way I have more time to stitch *fun* things). Makes taking along so simple: doctor's office, 5-hour round-trips to Germany, the garden for a half hour each evening when Axel comes home. When I get back, the hexies get sorted into my tray to make sure I'm keeping my color saturation where I want it. Am anxiously awaiting the arrival of the fabric I designed and was printed by Spoonflower and another order of Japanese fabrics ordered from the states. Also found some more gorgies at a friend's shop nearby.
And I promise to get busy on Jane again ... I realized today that I never blogged about my "fake" method for reverse applique - so that's on the top of the list for this week.
Maria, on the other hand, has been busy with Jane and you can see more of her gorgeous blocks here.
I know Deb has been busy too getting ready for their quilt show. Now if only we'd been smart-er and had told you about it before the show ...
And I'll be checking in with Dana later tonight.
Mary? I am sooo excited .. we've made a date .. to have coffee and exchange our little quilts .. in November!!
So, what have you been up to? Has your weather been as crappy as ours (not that I'm complaining - wink ... our summer just came early - April / May early and now fall is firmly on it's way). Are you busy with the summer, kids going back to school, new projects, heaven forbid that jump start on Christmas gifts? Tell us what's on your sewing table ... we'd love to hear, and if you have a blog we'll be sure to stop by and see!
Don't forget I blog over here too .. you'll find my latest knitting project, a day out in Gent, a another quilt along - I'm one of the designers ... and more! I hope you'll stop by!
Subscribe to:
Posts (Atom)