Tuesday, September 20, 2011

Carnival (Kermis) Brights!


I was able to sit down to the sewing machine for a while yesterday and made these four Contemporary Jane blocks. Am happy with the first three .. but didn't realize until later how much D-9 and A-8 are alike. So I will probably re-do A-8 .. reversing the background and using a completely different color - like green!

Happy sewing to you all .. things are bright and colorful around here. Kermis is in town although I have to admit it's much more bearable this year. It rained the first couple evenings which meant things closed down much early. Today is the most important day .. Jaarmarkt .. so I sat on the sidewalk with handwork and drew quite a few onlookers eager to know what I was doing and Why? Oh, and by the way, how did an American end up in Kalken???

Wednesday, September 14, 2011

Wednesday Works (in Progress)

I've been sadly neglecting Jane too long ..

Dear Jane ...

Quite a few blocks are "in progress" but I have no finished to show ... hopefully soon. Please don't give up on me.

I've been holding my breath all week. "Kermis" comes to Kalken this weekend and we're hoping beyond belief that we can avoid a repeat of last year.

This photo was taken from our bedroom window - let's just say we don't sleep much for three days!  so far there's no sign of the bus stop being blocked and any set up at our end of the road/village .. but there's still tonight. Last year they parked up their rigs in the middle of the night with a lot of shouting "no, a little more Left. LEFT. I said LEFT!!!"

oi vey .. g'night all .. if all goes well I'll stay indoors and stitch and stitch away and have lots to show when the Kermis pulls out of town on Wednesday next week.  xox Jovita

Sunday, August 28, 2011

Hot August Not

Honestly, where does time go ... ? In the back of my mind I've had this nagging feeling (along with a couple of migraines) that I haven't blogged here ... but then neither has anyone else.

I promise things HAVE been happening behind the scenes.

You see ... I got kind of caught up ... in a crazy hexagon craze! This wasn't really supposed to happen, considering I'm still busy busy on this and this. But you see, Lynne of Lily's Quilts started a "HEX A LONG" inspired by this quilt and then ....

Watermelon and Friends Overview

I only allow myself to work at this one a block at a time during the week and even then evenings only ... but weekends are fair game.

Then, there's this one, my take-along everywhere project. I picked up this simple but inexpensive case at Ikea (yes, I know coulda-shoulda *made* it but this way I have more time to stitch *fun* things). Makes taking along so simple: doctor's office, 5-hour round-trips to Germany, the garden for a half hour each evening when Axel comes home. When I get back, the hexies get sorted into my tray to make sure I'm keeping my color saturation where I want it. Am anxiously awaiting the arrival of the fabric I designed and was printed by Spoonflower and another order of Japanese fabrics ordered from the states. Also found some more gorgies at a friend's shop nearby.

have Hexagons - will TravelVintage Hexies

And I promise to get busy on Jane again ... I realized today that I never blogged about my "fake" method for reverse applique - so that's on the top of the list for this week.


Maria, on the other hand, has been busy with Jane and you can see more of her gorgeous blocks here.


I know Deb has been busy too getting ready for their quilt show. Now if only we'd been smart-er and had told you about it before the show ...

And I'll be checking in with Dana later tonight.

Mary? I am sooo excited .. we've made a date .. to have coffee and exchange our little quilts .. in November!!

So, what have you been up to? Has your weather been as crappy as ours (not that I'm complaining - wink ... our summer just came early - April / May early and now fall is firmly on it's way). Are you busy with the summer, kids going back to school, new projects, heaven forbid that jump start on Christmas gifts? Tell us what's on your sewing table ... we'd love to hear, and if you have a blog we'll be sure to stop by and see!

Don't forget I blog over here too .. you'll find my latest knitting project, a day out in Gent, a another quilt along - I'm one of the designers ... and more! I hope you'll stop by!


Thursday, August 4, 2011

Dad's "Plaids"

A-7 Dad's Plaids
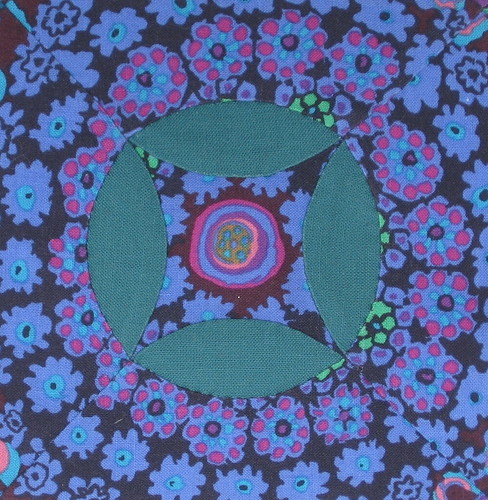
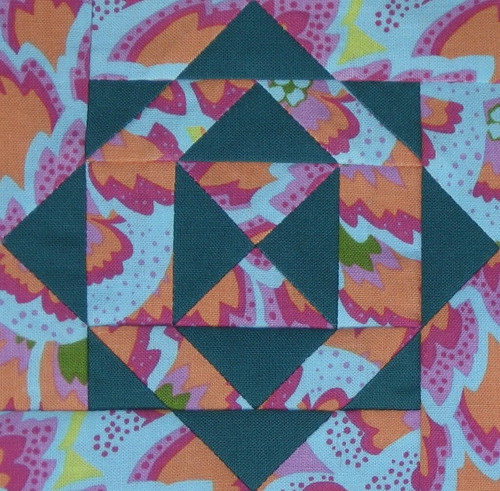
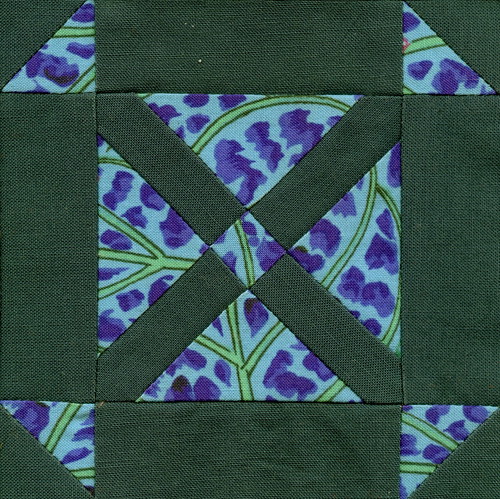
Dear Jane® book reference: Block A-7, page 20

Jovita's Method: hand "normal" and reverse applique, hand pieced

My comments: 
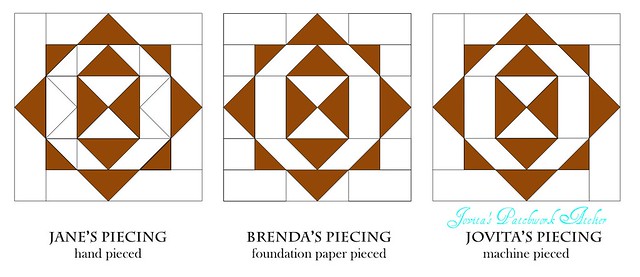
This is another block that can be constructed many different ways.  I am quite certain that Jane used traditional hand-piecing. In fact the Dear Jane® CD reflects this with lines drawn from the ends of the melons to the closest corner. The diagram in the book doesn't even closely resemble the picture of the block. So the first decision was which I thought would be more attractive .. hands down, Jane's block of course, but those extra seams would be very short and I wasn't in the mood.
So I decided to applique. Hmmm, normal applique for all four squares or two "normal" and two reverse?

I considered two things: 1) would how I appliqued make any difference to how I choose to quilt later? and 2) would one of my fabrics show through the other when I appliqued one on top the other?

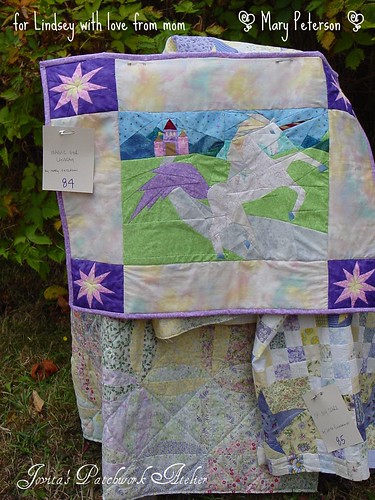
Wait, what? I'm thinking about the quilting already? Yes! That's what got me started on this whole crazy Contemporary Jane ride ... I saw THIS QUILT along with a whole bunch of you drooling folks!


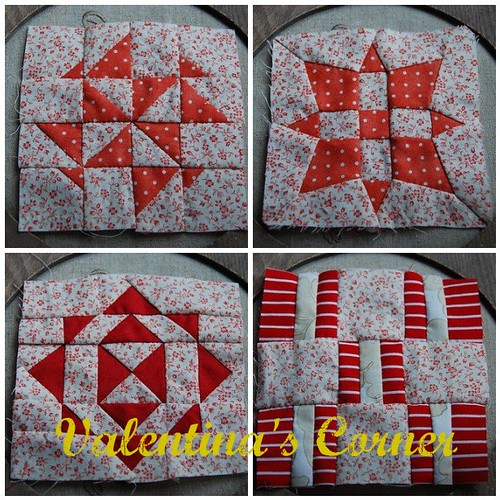
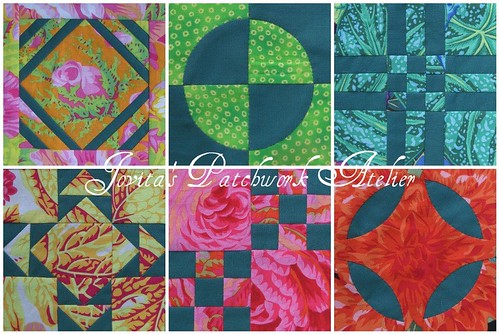
What I loved about this quilt from the get-go is that it is only quilted in the white "background" so if I want to do that (or have that lovely Judi of Green Fairy Quilts do that) then I am making sure I plan a little ahead now. Look closing at blocks B-1 Bachelor Buttons on the left and C-9 Jane's Tears on the right. It's quilted IN the white ... so to get this effect reverse applique will be necessary ... or in my case "fake" reverse applique - but I'll explain that tomorrow.


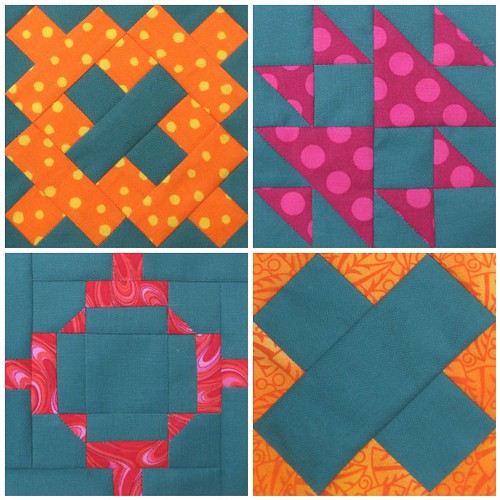
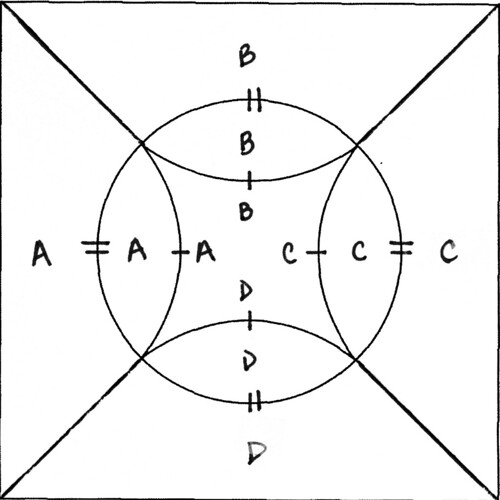
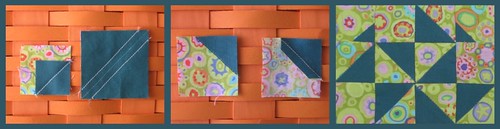
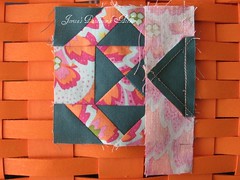
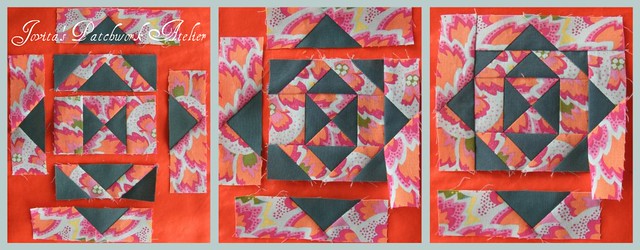
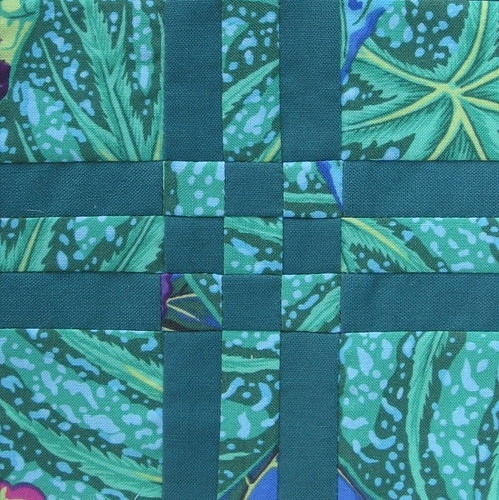
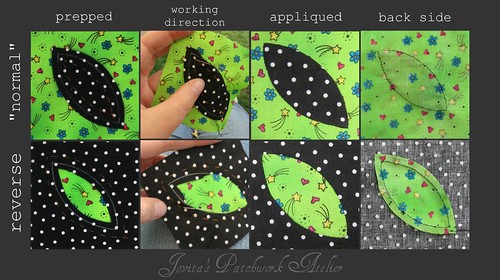
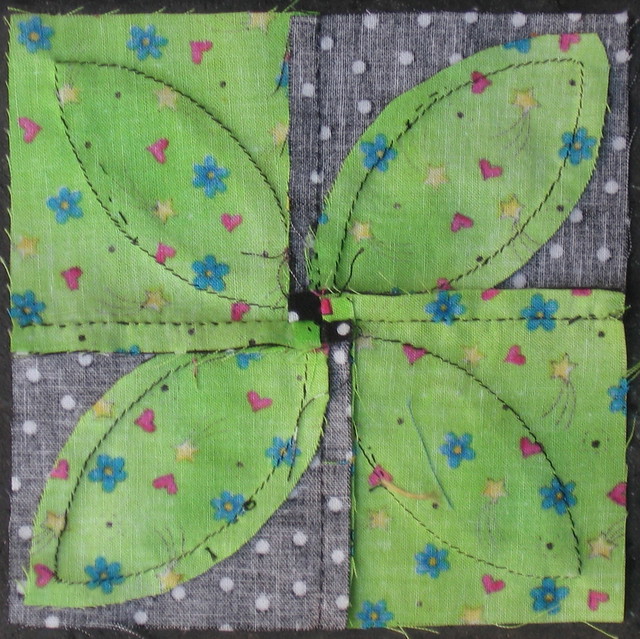
But I digress .. right now we're talking about A-7. I took a minute to think about quilting in the background and decided that yes, to get that look I'd need to do two in normal and two in reverse applique. Here's a picture to make it clearer.

So yesterday at Jovita's Patchwork Atelier I wrote a little FAQ / Tutorial about reverse applique and showed a few of the steps in picture format.

"normal" vs. reverse applique
Down-load a printer friendly version of this picture tutorial here.

A-7 Prep
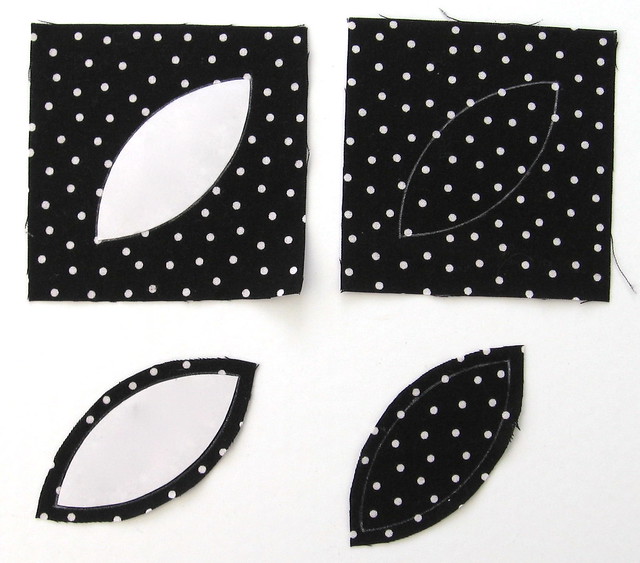
I prepped for the block by cutting:

Background (black):
Two 3-1/2" squares with the melon shapes marked* diagonally
Two melon shapes
   * My favorite marking tool for dark fabrics is the White Marking Pen Fine (Item # 517) by Clover.  


And I just read this tip: Save your melon template to use again for block E-10 .. although I'll probably be skipping that block (wink).

Print (green):
Four 3-1/2" squares

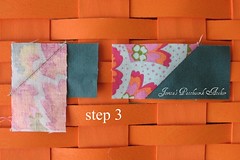
Place two melons diagonally onto two green squares and baste in place (see diagram above).  Your basting should be a bit more than a 1/4" inide the marked line on the melon.

Place each marked black square on top of a green square.  Baste around the outside edge of the melon shape a little more than a 1/4" from the line (see diagram above).

A-7 Reverse Prep
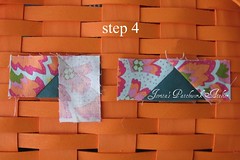
Carefully clip away the inside of the applique shape taking care that you leave adequate seam allowance and don't cut into your applique shape below.

Now, you can turn these shapes over and trim away the excess green or leave it until you've finished your applique. I did one each way and noticed no difference.  There's a photo here of the backs of the basted pieces.

A word on clipping your seams ... since I'm not going to do a full blow-by-blow how to applique here, I'll just say this ... clip as seldom as possible. I know this may go against the grain of so many tutorials you've seen of hearts being clipped every 1/8" all the way around it. But you don't have to, trust me ... a heart needs one clip - in it's valley. Your melon's don't need a single clip. When do reverse applique on the melon you'll need a few more - I clipped six times. One in each "valley" end and twice on each side. Here's a pic where you can see me taking the first clip on a reverse-appliqued melon .. see the angle of my scissors? I'm not clipping straight into the seam. I'm clipping with the grain of the fabric between the threads to prevent as much fraying as possible.  Want to know more about applique but live too far to come visit me, then I recommend "The Applique Sampler" by Becky Goldsmith and Linda Jenkins as a jumping off point. Then take as many classes from as many different teachers you can - you'll be amazed how you pick up a bit here and a bit there until you find your style that fits you perfectly.

A-7 Trim
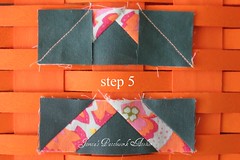
Geez, I almost forgot .. after you have all four quadrants appliqued, you need to trim them.  Use a square ruler and make sure that diagonal line runs right through the center of your melon. Trim each quadrant to 2-3/4" square (for me that meant the points were each 3/8" from the corner). Then hand or machine piece your 4 blocks together. Personally, I found it much easier to hand piece since the melons are just 1/8" from the edge.


Wow, so that was one long-winded post about this little block .. but I hope it helped and that my waffling on about things I think about helps you rather than gets in the way.

Please comment, ask questions or request a tutorial on a block that's stumping you. We look forward to hearing from you.

A-7 (reverse)
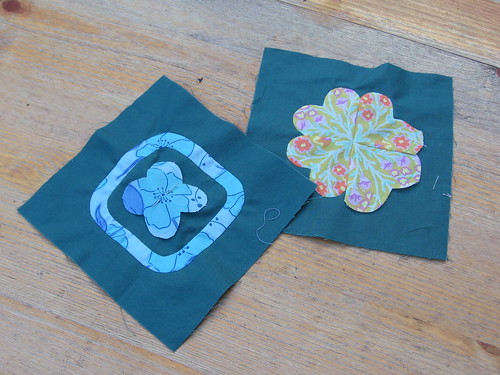
Oh, and here's a picture of the back of my block .. well, not my block .. I made this one for Maria but didn't tell her and so she made one too while she was on vacation. Check the flickr group tomorrow, I'll have a pic of my block up and a post here about how I "faked" the reverse applique on those other two blocks.

  • Minka made this block and then went back and re-made it using a different technique, you can read more about it here.
  • Anina, from That Quilt walks you through her approach here.

Tuesday, August 2, 2011

Back to Jane

I'm back from a fabulous two-week "staycation," which you can read about here and here.  The weather was crappy most of the time so I'm taking advantage of today's sun (and natural light) to do some stitching in the garden.  Maria asked me to explain "reverse" applique so I'm working on that for you all and will post a tutorial / FAQ at Jovita's Patchwork Atelier tomorrow.

Then be sure to pop in on Thursday to see a step-by-step explanation of how I made block A-7 Dad's Plaids using applique and reverse applique.  On Friday, I'll show you how I "faked" some reverse applique to do blocks B-1 and C-8.

Back to Jane

Thursday, July 7, 2011

Hunter's Moon

A-3
Dear Jane® book reference: Block A-3, page 18

Jovita's Method: hand pieced

My comments:  I looked at this block for a few minutes, first at the diagram and then at the picture of Jane's block and noticed that four of the seams were missing.  Once again, a choice.  With the seams, it makes hand piecing (which I think is what Jane did) much easier.  Without the seams, then applique makes sense.  It didn't take me long at all to decide to hand piece it and I'm glad I did because it went together like a charm - except for that wonky seam in the top left corner - must go see what I did funny there.

I did do a bit of preparation first though.  Here are the steps that I followed:
    Jane A-3 paper
  • transfered pattern to freezer paper and added one registration mark along each curved edge ... this is where I might have gone a tad wrong. 
On a Dutch site where a bunch of people were moaning about this block, ONE lady pointed out that the melons are not symmetrical!  What?? Yep, I checked - she is right. So in the diagram here I put two marks along the ring of the circle for you.  (I wish I had done this for me and am now wondering if my circle would look more circular.)  And of course if you are appliqueing the melons on top, this orientation would make a huge difference to the round effect you're trying to create.
  • cut out the pattern pieces and iron them to the wrong side of my fabrics - remember to keep the grain of the fabric running in the right direction.
  • I pieced the melon shapes first to the center shape.
  • then pieced each side piece .. working around in a circle. when I got to the end of one I just picked up the next and kept going.
  • once all four sides were complete I went back and sewed the diagonal corners. I did think about coming downstairs and sewing them by machine to make it quicker but I was settled so nicely into the sofa that I just kept going by hand.  
A-3 (reverse)
Here's a picture of the back so you can see how I pressed my seams.  I'm sorry I didn't take more pictures along the way, but next time I will ... I tend to do handwork in the evenings when the light for photographs is just too crappy.  And I know the colors don't seem great here, but it all fits into the scheme of my plan for this quilt.

Of course, there are OTHER OPTIONS for piecing this block, here are just a few while browsing on-line.


Many approach this block with applique, as suggested by www.dearjane.com's block tips.

Kate machine pieced the background and then hand-appliqued the melons on top.

It appears that Jayne appliqued first the white circle onto the (un-pieced) background and then appliqued the center piece on top of the white.

And Anina, does a fabulous job appliqueing this block, including reverse applique for that tricky "circle."

You might want to check out Karissa's block too, she just fudged the melons a bit so she could applique them all in one piece.  Carrie did the same thing.


And I just found this one .. I like this .. great compromise. Karen hand-pieced the melon piece to each quarter then appliqued that to the center piece - genius!!  A tiny bit of hand piecing - great for practice, no reverse applique and the best results I've seen so far :)

Sunday, July 3, 2011

Pinwheel Gone Awry


Dear Jane® book reference: Block A-1, page 17

Maria's Method: hand pieced

My comments:  Why not start @ the beginning? That is what I said to myself about blogging about Dear Jane. So, here I go on Block A-1.

All I can tell you is that I didn't want to piece it like Jane did. The pin wheel is all messed up. And I love pin wheels. So this one hurt me just a little bit. I guess that is why BP named it Pin Wheel Gone Awry. BP did name these blocks - right? I guess, I need to do my research. I'm sure someone will inform me. Another thought: Jane's piecing in the picture didn't help me much. Man, we are sooooooo annal about our "perfect" piecing today. It didn't look like she was "perfect" at all. Why do we fuss so much?

For most of my blocks I will hand piece. Crazy? Yes. But I don't do very well with little pieces on my sewing machine. For my sanity, I'm tracing the pattern on to plain paper and coloring the "dark" color areas so I can "see" it.
  • Next I trace it on to freezer paper. Number the pieces in rows and piece order, color the pieces that are my bright colors.
  • Then cut it out. Iron it to the wrong side of the fabric.
  • Add 1/4 inch seam allowance to each side.
  • Cut fabric pieces.
  • Keep the freezer paper on the back of the fabric until I'm ready to hand sew.
  • Everything goes into a snack size zip baggie. And it is labeled A-1 or whatever.
I've never hand pieced, I am a beginner. No shame here. My mother-in-law, Marilyn, nudged me to learn to hand piece. Thank you Marilyn!!! For my birthday, she gave me 2 books on hand piecing. The New Sampler Quilt by Diana Leone. This book is an overall beginning quilter's book. Very nice for reference. The other book is Jinny Beyer's Quiltmaking by Hand. Oh dear, Jinny Beyer is such an inspiration!

I also found a nice tutorial online Hand Piecing with Crispy.

How I wish Jane was up to date electronically. I'd love to have this book on my iPad. But I'd still use my book to transfer the images to freezer paper.  I hope you give hand piecing a try.

Jovita pieced this block by machine. Click on the photo below for more information.
Jane A1

Anina, from  shows you how to foundation paper piece this block here.

Saturday, July 2, 2011

One - Two Buckle My Shoe

A2 One Two, Buckle My Shoe
Dear Jane® book reference: Block A-2, page 17

Jovita's Method:  machine pieced

My comments: This block puzzled me a bit when I first looked at it.  The diagram in the book was clearly not the same as Jane's original piecing.  Which should I follow? ... well, I think we're pretty clear that I am not planning to be a purist and follow this pattern to the T.  So I came up with a 3rd option, making the machine piecing simpler and subtracting quite a few seams. If for no other reason than to make quilting easier, regardless of whether it will be hand or machine quilted.

A2 piecing diagram

By the way, you can reduce all those seams when hand piecing too.  When drafting your templates it might be easier to look at my diagram.

Rotary cutting instructions for use with machine piecing - all seam allowances are 1/4"

I used a lot of what I call the Quick 45˚ Method for this so my cutting instructions may seem strange at first.  With the exception of A and F, you will only need to cut squares and rectangles .. all those strange pieces? ... see the steps below to see how those were created.

Background (my print):
  • One 2-3/4" square (A) ... cut these twice in half diagonally, you will only use two of these new triangles.
  • Ten 1-1/4" x 2" rectangles (two B, four C and four D)
  • Four 1-1/4" x 2-3/4" rectangles (E)

Print (my solid teal):
  • One 2-3/4" square (F) ... cut these twice in half diagonally, you will only use two of these new triangles.
  • Six 1-1/4" x 2" rectangles (two G and four I)
  • Four 1-1/4" squares (H)


So, here's how I went about piecing this block.
  1. C to G and D to I
    Piece a traditional hourglass shape with pieces A and F.  The triangles were cut a little large to give you room to trim this unit to 2" square.
  2. Add Bs to each side of this unit and press the seams toward B for minimal bulk.
    1. For the "flying geese" shapes place a C right sides together on top of G lining up the top and left edges. Carefully draw a line from the bottom left of G to the top right of C.
      C to G/C
      Sew along this line and then press backwards to check that the shape is straight. (I trimmed these seam allowances to 3/16" ... yes, do this! trim these, some people don't but trust me with a block this size you will not want to. Regardless, I always trim them.)   Make two of these using C and G, and four using D and I.
    2. Hs to C-G-C
      Now place another C on top of your C-G unit, this time lining up the top and right edges.  Repeat the same process .. you should now have completed two C-G-C units. Use this same technique to make four D-I-E units, see a quick photo here.
    3. Add a H to each end of both C-G-C units.  Again: draw, sew, press and trim. 
    Sew a H-C-G-C-H unit to the top and bottom sides of the hourglass + B unit.

    adding D-I-E inner blockOn the wrong side of one D-I-E unit, mark 3" from the D end.  Pin this to your inner block unit lining the mark up with the edge of the block.  Sew from the D edge to the edge of the goose shape.

    Your are now able to sew the complete seams ... for example the next unit would be placed across the top edge and sewn fully edge to edge. After the 4th side is sewn go back and finish sewing the first seam, lining up the edges and overlapping your stitching by about 1/2". Adding D-I-E


    • Minka re-drafted this block too!  Check out what she did here, it's adorable!!
    • Anina, from That Quilt shows you how to foundation paper piece this block here.

    Monday, June 27, 2011

    Dream Swing Quilt


    I have been working on this mini quilt for Jovita. This charming pattern was OODLES of fun to do! I made the scrappy background with fabrics I have collected over the years, including cuttings from an old baby blue sweater of my daughters. ( Nothing is safe around my house!) I hand stitched the piece to muslin and mounted that onto a nice red background. I love to free motion quilt, and thought a little prose would be a nice touch. I wrote what came to mind...My dreams meet me under the tree and gently swing me back and forth..

    I had a swing in my front yard growing up in Chagrin Falls ,Ohio and actually the little girl in the pattern does look a little chagrined (?) Anywho, I digress..

    After free motion quilting the prose I was faced with my old nemeses' ..BINDING and HANGING SLEEVES. These two things involve way too much trouble for this lazy quilter. BUT alas, I am making this for the woman who taught me the basics of quilting, the QUEEN of technique and the lot!!

    So, I must bind and I must sleeve...and I am honored to do so!!

    Saturday, June 25, 2011

    Meet Mary

    Set Her Free
    Mary and I are doing a swap ... and I wanted to tell you that I've been blogging about the design process of her quilt on my blog and thought you might want to stop by and check it out ... I've been carrying these little saltwater pearls around in my pocket waiting for the opportunity to add them to her little quilt ...

    ... but then I realized I haven't properly introduced Mary, who played a very crucial role as I began my venture as a shop owner.

    She and I met when I was teaching foundation paper piecing class before my studio/shop got off the ground in Mukilteo and when I did open she kind of followed me there.

    Thank goodness too .. her kind, caring, calming ways have come in handy more times than I can count.

    Like introducing me to black coffee topped with softly whipped cinnamon whipping cream .. oh my goodness.  If you haven't, you need to try this!  Sip slowly, letting the cream melt in and mix with your coffee as you go ... it's sure to calm your nerves and give you the energy to carry on!  Of course this experience is at it's best when shared *with* Mary ...

    Lindsey's quiltOne thing I've always loved about Mary is that she is always game for trying new and challenging things ... the class where we met?  Introduction to Foundation Paper Piecing .. no houses for her .. she wanted to work on this unicorn.  And did ... and finished it and bound it!  ... see the two quilts under her's, they are both mine (the binding *has* been put on the one on the left, the one on the right? - umm, it is still waiting for a border ...).

    Mary has really moved on and is a wonderful mixed media artist showing at a variety of galleries in the Pacific Northwest. Visit Funky Fibers to read more about Mary and her artwork, gallery showings and workshops.

    As for me, I am especially in love with her series of bathing beauties!

    Mary's Bathing Beauties

    P&P watercolorShe is also responsible for this ... a most cherished memory of my shop. The original photograph was taken by her mother-in-law, the watercolor is by her father-in-law.  

    There is a lot more to tell you about Mary, but I'm hoping she'll do some of that herself and show us more of her projects.  And tell funny stories about her two beautiful daughters!

    Thanks for joining us Under the Willow Tree Mary, with tons of Love from Jovita and the rest of the gang!

    Tuesday, June 21, 2011

    Guest Post: Valentina in Cyprus

    How very fun to start off our Guest Posts with a call from Cyprus by Valentina.
    Spring has been zooming by for me too, but somehow it all came together on the 1st of June. I finally took the plunge and started my Dear Jane.  I had spend the entire month of May agonizing about my colour choices and finally settled on these:
    DSC_0161

    It has become a soft contemporary palette made lively by some Salmon pinks, Cherry reds, Mustards and even some greys.  I have also decided to make my templates from Mylar and stitch the blocks by hand- making my work so much more portable which is essential, as I work around my 5 year olds. 
    I am also playing with the idea of having different backgrounds for each row of blocks while keeping some of the Trip around the World aspect of the original.  My plan is that rows A and M will be basically the same, B as L etc. This helps me to keep some order in my mind and will allow me to start sashing my blocks as I finish each row. 
    Of course plans change all the time and I am so looking forward to see how working together will influence my work.   And these are the first fruits:
    Valentina's mosaic
    I don't know about all of you, but I am definitely drooling ... and thinking about some fabrics I have that would play nicely with Valentina's color scheme.  Off to pull them now and see if she'll send me her mailing address as a big thank you for being my first guest blogger ever!
    Be sure to stop by Valentina's Corner and check out some of her other projects!

    I am finding that she and I have a lot in common and feel like I've found a true kindred spirit.

    And by the way ... if you'd like to join us, we'd love to have you be a part of our quilt along!  Linky up your blog here and / or email me your Contemporary Jane story along with some photos of your pile of fabric and some of your blocks, if you've already started.

    Monday, June 20, 2011

    Granny Weaver


    J-6

    Dear Jane® book reference: Block J-6, page 92

    Jovita's Method:  machine pieced

    My comments:  This block was easy peasy ... I followed Twiddletails perfect instructions for strip-piecing it!  Just click on over here and you'll be all set.

    Yes, too easy, but I wanted to ease us all in, I hope no one minds.  There are more difficult blocks and we will be getting to those ... but why make life hard on the first day.

    Instead I thought I'd talk about the fabric ...

    This fabulous fabric gives lots of options for Contemporary Jane blocks .. I figure I'll be able to get at least five blocks out of it without anyone knowing it was the same piece.  hehe, the red arrow is meant to point at the tip of the leaf that I used for this block.

    Fussy cutting for Jane
    Jane M-2
    In fact, here's the 2nd block I've cut from it already although it is a reject ... maybe ... not sure ... more about that later. LMAO .. just noticed this block is called "Duff's Bluff" that just tickles my funny bone.  (Dear Jane® book reference: Block M-2, page 113)  But you can probably spot the two leaves I used (one is just above the red arrow) .. cool, huh?

    Check out the selvage too .. this is a Phillip Jacobs fabric .. they play along great with Kaffe's fabrics and I'm not being a snob .. if I like it it goes!

    So there you have it!  Block one of ... um ... 169 blocks.  But I promise it's going to be a fun ride full of tons of information.  Your input is also highly regarded, if you have questions, comments or ideas, please don't hesitate to drop me an email!

    Thanks for quilting along, Jovita

    Other links to this block: Dear Jane® and A Quilter's Journey

    Contemporary Jane Kick-off

    Hi ladies and gents!  I am truly sorry it has taken me so long to get this going ... I could make excuses, but let's just get this ball rolling instead!  I am so excited about this quilt and quilting along with all of you!

    Quite a few ladies have signed up for our Contemporary Jane quilt along ... if you're name's not on the list be sure and let me know ... or linky up your blog here.


    And boy oh boy have some of you ladies who are joining us been busy!  

    Be sure check out our Flickr group, these ladies have been uploading pics faster than I can blink ... you'll want to check these out!  Quiltdiva is working in BATIKS, "Pink" has posted some fabulous PINK and green blocks while Bea is also working along with KAFFE fabrics, 

    With everything going on I haven't done much past my first seven blocks, but two are partially hand-pieced in my take-along bag and if I have anything to say, they will be finished this week - bringing my tally up to 9 blocks.

    CJ mosaic

    So, you're asking how is this going to work?  Well, once a week Deb, Maria or I will post here, Under the Willow Tree, a new block that we've made.  We'll tell you how we made it and what worked or didn't work.  You are welcome to work ahead, behind or right along with us ... we're not setting limits or deadlines, we're just going to have fun!

    ... our aim is to make "our" Jane ... we're not using reproductions but sticking to fabrics that reflect us now and with the freedom to add, change or leave out blocks that don't fancy us. To get an idea of what we mean, check out our "Contemporary Jane" board on Pinterest. For more useful Jane links, please see this post.

    So Ladies and Gentlemen, hold onto your hats ... heeeeeeer we gooooooo!!

    Monday, April 25, 2011

    Quilt Shop In A Box

    Elisabeths' Garden by Jovita Goldschmidt (Hand Sewn)
    I wondered why I didn't get an email back from Jovita!  I put this box together to hold my applique supplies, and it turned out to be a great portable project box. I was inspired to start a hexagon project from many different sources.  First I saw Jovita's little tin box packed with the most gorgeous colors of silk and tiny little hex's.  (If she can be cheeky, then so can I - copied & pasted without consent!)
    I also have seen many colorful blog posts on hexagons such as http://venusdehilo.blogspot.com/2010/05/kaffe-fassett-hexie-flowers.html  and http://kellyrachel.com/blog/2011/02/23/wednesday-hex-along/  and "sew" many more!

    I haven't yet decided on what to do with all my little  1/2" hexagons. This is a quilt I saw at the machine quilting show in Tacoma a couple years ago - I do not have the name of the quilter but I love the quilt!


    These are a couple more shots of my box of goodies!


    I don't say GOT DOTS!  I say GET HEXS!